First ascent:
Warren Harding, Wayne Merry, and George Whitmore, 11/58
Notes on the route:
The Nose. Who hasn't heard of this one. To brush up on your history,
read all about it in The Vertical World of Yosemite, by Wilderness
Press. At the time of the first ascent, there were no "men
on the Moon", no real pitons, certainly no camming devices,
no Jumars, no portaledges, and haulbags were usually stolen from
the Postal Service. What they did have was drive and determination...and
a nice set of huevos.
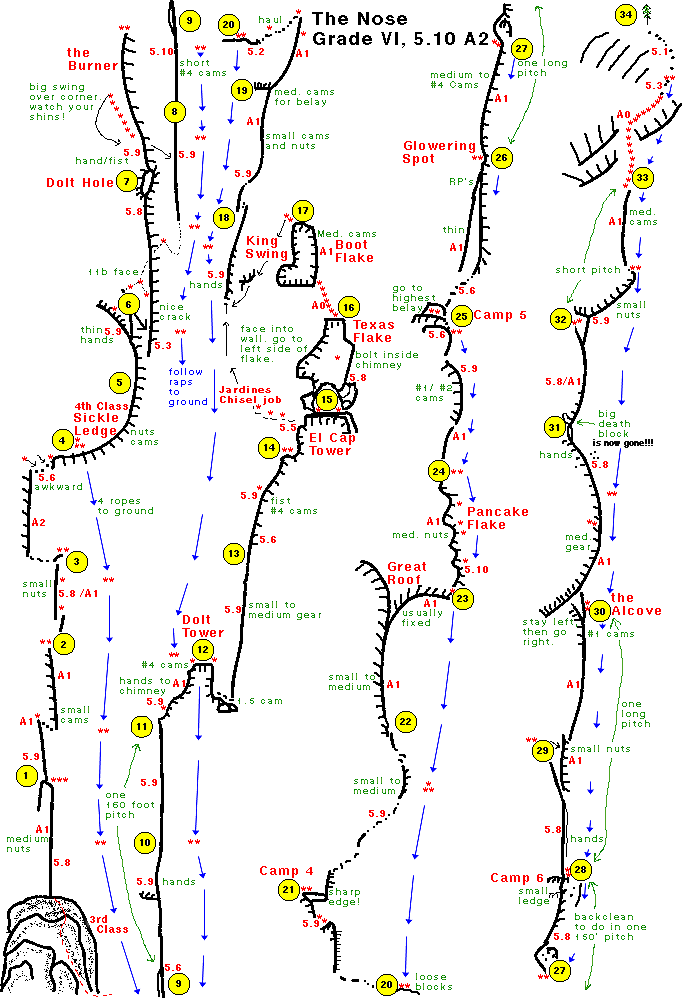
For this topo update we chose to do a middle of the road type thing. What this means is that the notations and grades are for a climber who is able to climb 5.10 cracks, at least when fresh, and has some aid experience. The great thing about the Nose is that it can be done at either 5.2/A2 or 5.13C A-nuthin'. Take your pick.
You'll notice the blue arrows and lines on the topo. These are the escape routes from any point on the route. The Nose has been the scene of numerous disasters and near miss rescues. Ages ago a guy call "Rohr" (sp?) placed the linked anchors from the top of the Nose all the way to the ground. This was his kicks. When I was on the Nose (a billion years ago) I remember seeing this older guy with a frame pack rapping from the summit via these anchors. Rohr did this every year I was told, just to make sure they were up to spec. Some of the anchors have a metal plate attached that gives the amount of feet and direction to the next anchor. Pretty impressive!
Gear List: Leave your pitons at home on this one....it's
gone clean for decades. The only odd thing you might need is a
"bat hook" just incase a bolt pops out on you.
All the usual wall stuff inc. tons of biners, a pulley, a lowerout
line etc.
2 sets brass nuts
2 sets of wireds
2-3 sets of SLCD
2ea TCU to 1"
nut tools
lots of slings
2 50 meter ropes minimum.
The Nuts and Bolts:
Pitch #0, or the 3rd class to get to the route. This part sucks
and you could get lost or hurt right here. Start just left of
the right side of the big mess at the base. Wander carefully up
and left to the start of the route. Or, you can go way left along
the base and then work your way up right to a ledge with a pine
tree on it, moving right from there (5.7) to get to the start.
Pitch #1 : obvious crack, 120ft.
Pitch #2 : shorty, like 80ft.
Pitch #3 : shorty again, 75ft.
Pitch #4 : pendulum over right to a layback and then up to second penulum point. Tension and claw onto Sickle ledge. Move way right (like 40+ feet) to the real anchors. Fix to the ground with 4 ropes.
Pitch #5: easy 4th class. Hauling is a different story.
Pitch #7: lower down about 40+ feet and tension over right into the corner. Run it out until some fixed anchors appear and then continue up the crack to the Dolt Hole belay.
Pitch #8: for the pendulum, lower almost to the belayer. Watch out as you jump the corner, banged up shins are quite easy to get. Run it out to reduce rope drag, about a 140ft pitch.
Pitch #9 : shorty. Belay just below roof.
Pitch #10/11: run these together. 150ft.
Pitch #12: mostly wide stuff. Go right onto Dolt Tower and belay on the left side. Move your stuff to the right side of the tower for the next pitch.
Pitch #13 : shorty, like 70ft. Belay at stance, and lower out the haul bags.
Pitch #14: fisty and awkward. Belay at ledge.
Pitch #15: shorty, like 70ft. Lower out haul bags. Follow on belay instead of jugging. Best ledge around.
Pitch #16 : ugghhh. the dreaded Texas Flake. I was facing out and had the shakes on this baby. Talus food for me...but I lived. Best method these days is to face the wall and clip the chicken bolt half way up. Haul off the big bolts above the flake and have the haul bag go on the outside. We fixed this pitch and then put the fixed line outside the flake for the next day. If you clip the chicken bolt, this will be impossible unless the belayer cleans the pitch.
Pitch #17: the Boot. Great pitch. Good ledge on top...for one. What keeps this thing on the wall?
Pitches #18 : go down to the "toe" and pendulum over to the next point, then do it again to gain the corner. Run it out to the belay, which is level with the top of the Boot. Lower out the haul bag, and the second raps down lower out line, and then moves onto lead line to finish the pitch. This place is epic central, as you will see with all the stuck ropes and junk trapped in the Boot. take your time and do it right.
Pitch #19: belay under the overhang (90+ft) and don't be suckered into going all the way to the 4th class ledges.
Pitch #20: continue up crack to obvious pendulum point. Lower down and left along the 4th class. This is going to suck for hauling, so move wisely until you find a good place to haul. Watch out for loose blocks and sharp edges. Desparate parties can bivy here, 1 to 2 people.
Pitch #22 : watch the haul bag here, it likes to get stuck.
Pitch #23 : usually fixed. Second can clip clean instead of jugging under the roof.
Pitch #24 : shorty, but pumper at 5.10. 85ft.
Pitch #25 : climb as high as possible to good ledges. Go at least 130ft.
Pitch #27/28 : run together. 150ft and watch rope drag. Camp 6, the Sewer of the Monolith. Bring some incense or Vicks Vapo-Rub for under your nose.
Pitches #29/30 : run together. 160ft.
Pitch #31/32 : the death blocks. Sheesh! I wish somebody would just rifle up there and after checking with the lookout on the ground, honk this thing off. It's big and secured with junk to the wall. Just stay away. Another block lives just below the Alcove (32). Leave this alone too.
Pitch #33 : shorty, 70ft.
Pitch #34 : nice new bolts. Communication problems form the belay to the follower. Say what? Off belay? OK!!!!!! From here waltz onto the summit.
Info provided by: Russ Walling, Greg Byrne, Doug Munoz and scores of others. Some great trip reports about the Nose are floating around on the web. Seek them out.
